3 Ways to do Facebook Domain Verification and Edit Link Post Previews
Take Control of Your Content Packaging
Updated for 2019!
Facebook has provided much needed details on how to edit your link posts and take control of how your content appears on Facebook. Facebook has introduced the concept of “Domain Ownership” which allows businesses to claim domains and say “This link is mine!”. In this post we share how to complete the update in 3 steps:
- Add your Web Domain to your Facebook Business Account
- Complete DNS Verification or HTML File Upload
- Associate Your Pages with a Verified Domain
When Do You Need to Make Updates?
We recommend taking action with the directions below as soon as possible since starting in early 2018 Facebook began enforcing domain verification: “In early Q1 2018, we will only allow verified domain owners to edit their link posts.” (source: Facebook). Configuration should take less than a few hours.
Content is a product, and how you package your product is critical. The sooner you make these updates to take control of your packaging the better.
Context: With Great Power Comes Great Responsibility
On July 18th, 2017, Facebook discontinued the ability for most teams to modify their link content previews due to concerns around bad actors modifying the packaging of content that wasn’t theirs to modify.
“As part of our continuing efforts to stop the spread of misinformation and false news on our platform, we’re removing the ability for any Page to edit how a link appears on Facebook. By removing the ability to alter link metadata (i.e. headline, description, image) from all link sharing entry points on Facebook, we are eliminating a channel that has been abused to post false news. Our blog post has more information. On July 18, 2017 the ability to overwrite metadata for previews attached to link posts will no longer be available for most Pages and apps.” – Facebook
Imagine a bad actor modifying the Washington Post article that debunks the story that NASA was kidnapping children and sending them to Mars, instead writing “NASA Takes Kidnapped Children to Mars”. Unfortunately, some people believe this, sharing without reading. Bad News Bears.

Yes, this is a silly example, but the underlying issue - unrestricted editing - can cause issues. Facebook understandably needed to take action. That said, social media teams regularly modify their Facebook link post image, headline, and description to something other than the default content defined in their Open Graph Tags (aka “OG” tags; learn more here. Facebook previously allowed teams to do this for years, since default text and images often aren’t optimized for Facebook. Headlines can be too long, not punchy enough for social, or need revisions, and images may simply be low quality or not the best performing option.
Editing enables teams to improve post engagement by using better content packaging. This is why clients use Naytev to A/B Test Facebook and Instagram posts.
A Flexible Solution Is Here! Facebook Domain Verification with Business Manager
Facebook is providing a few ways to not only edit link previews again, but also allow you to claim content ownership so that only your team can modify your link post previews. Awesome!
All methods involve verifying your ownership of your web domain. Here are your options:
- DNS Verification (involves Business Manager)
- HTML File Upload (involves Business Manager)
- Open Graph Markup Tag (no Business Manager)
Facebook (and Naytev) recommend option 1 or 2; they’re easier to manage and more flexible. Below are Facebook’s exact recommended steps for implementing these two options.
Once you complete these domain verification updates, feel free to try Naytev's new, free social media analytics. It's the only tool that gives you a full performance breakdown of post performance across all posts and social networks that you share each piece of content — spanning Facebook, Instagram, Twitter, LinkedIn, and Pinterest:

Complete Facebook Domain Verification with Business Manager
We’ll keep this brief. There are 3 Steps:
- Add your Web Domain to your Facebook Business Account
- Complete DNS Verification OR HTML File Upload
- Associate Your Pages with a Verified Domain
We've share the detailed steps below. While you work on this, consider listening to the latest episode of our Future of Media Podcast in the background — it's with Mitchell Pvao, SVP of Digital at Leaf Group:
You can also read the full transcript here.
Step 1: Add Your Web Domains
Regardless of whether you go with the DNS Verification or HTML File Upload approach, you’ll need to first add your domain(s) in Business Manager; this takes just a minute. Here are Facebook’s instructions:
- button.

- from the left side navigation list.

- pop-up dialog.

- If you have more than one domain listed, select the domain for which you desire to confirm ownership. Note: Facebook enables you to share your domain with a partner if needed – more on this at the end of this post.
- Choose the method you wish to use to verify your domain: DNS Verification or the HTML File Upload. Note: You only need to use one method.
Add a DNS TXT entry to your DNS record to confirm ownership
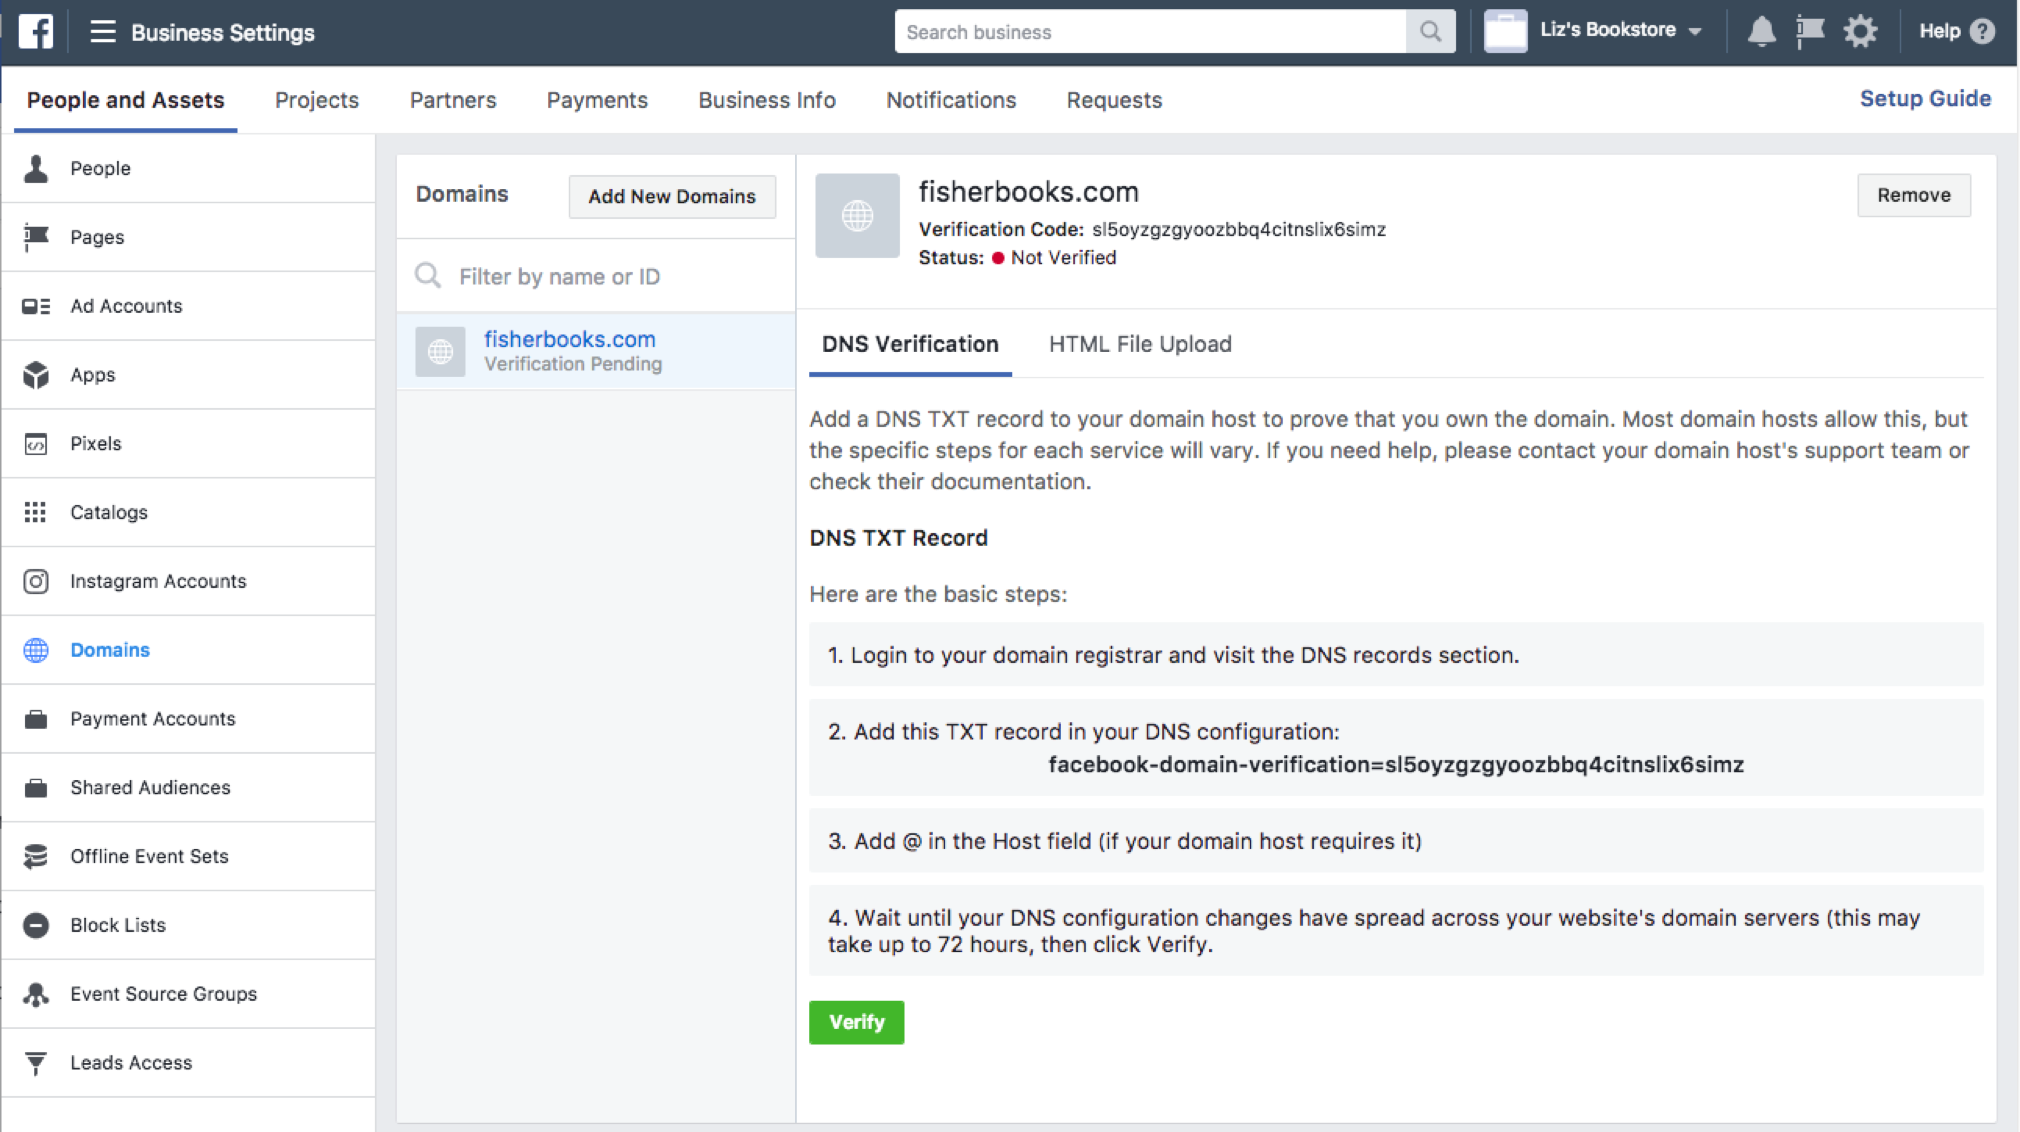
The DNS Verification tab of your selected domain provides the TXT information you will need to add to your DNS record.
- Navigate to the DNS record section of your domain host.
- Add the TXT entry to your DNS record.
- Add @ to the Host field (if it is required by your domain host).
- Once the changes have propagated across your domain’s web servers, click the Verify button at the bottom of the DNS Verification tab for the selected domain.
- Leave the TXT entry in your DNS record as it may be checked periodically for verification purposes.
If you don’t want to use DNS Verification, then instead you can upload an HTML file to your web directory and confirm domain ownership in Business Manager. You’ll need admin access to your website’s root folder to use this HTML file option.
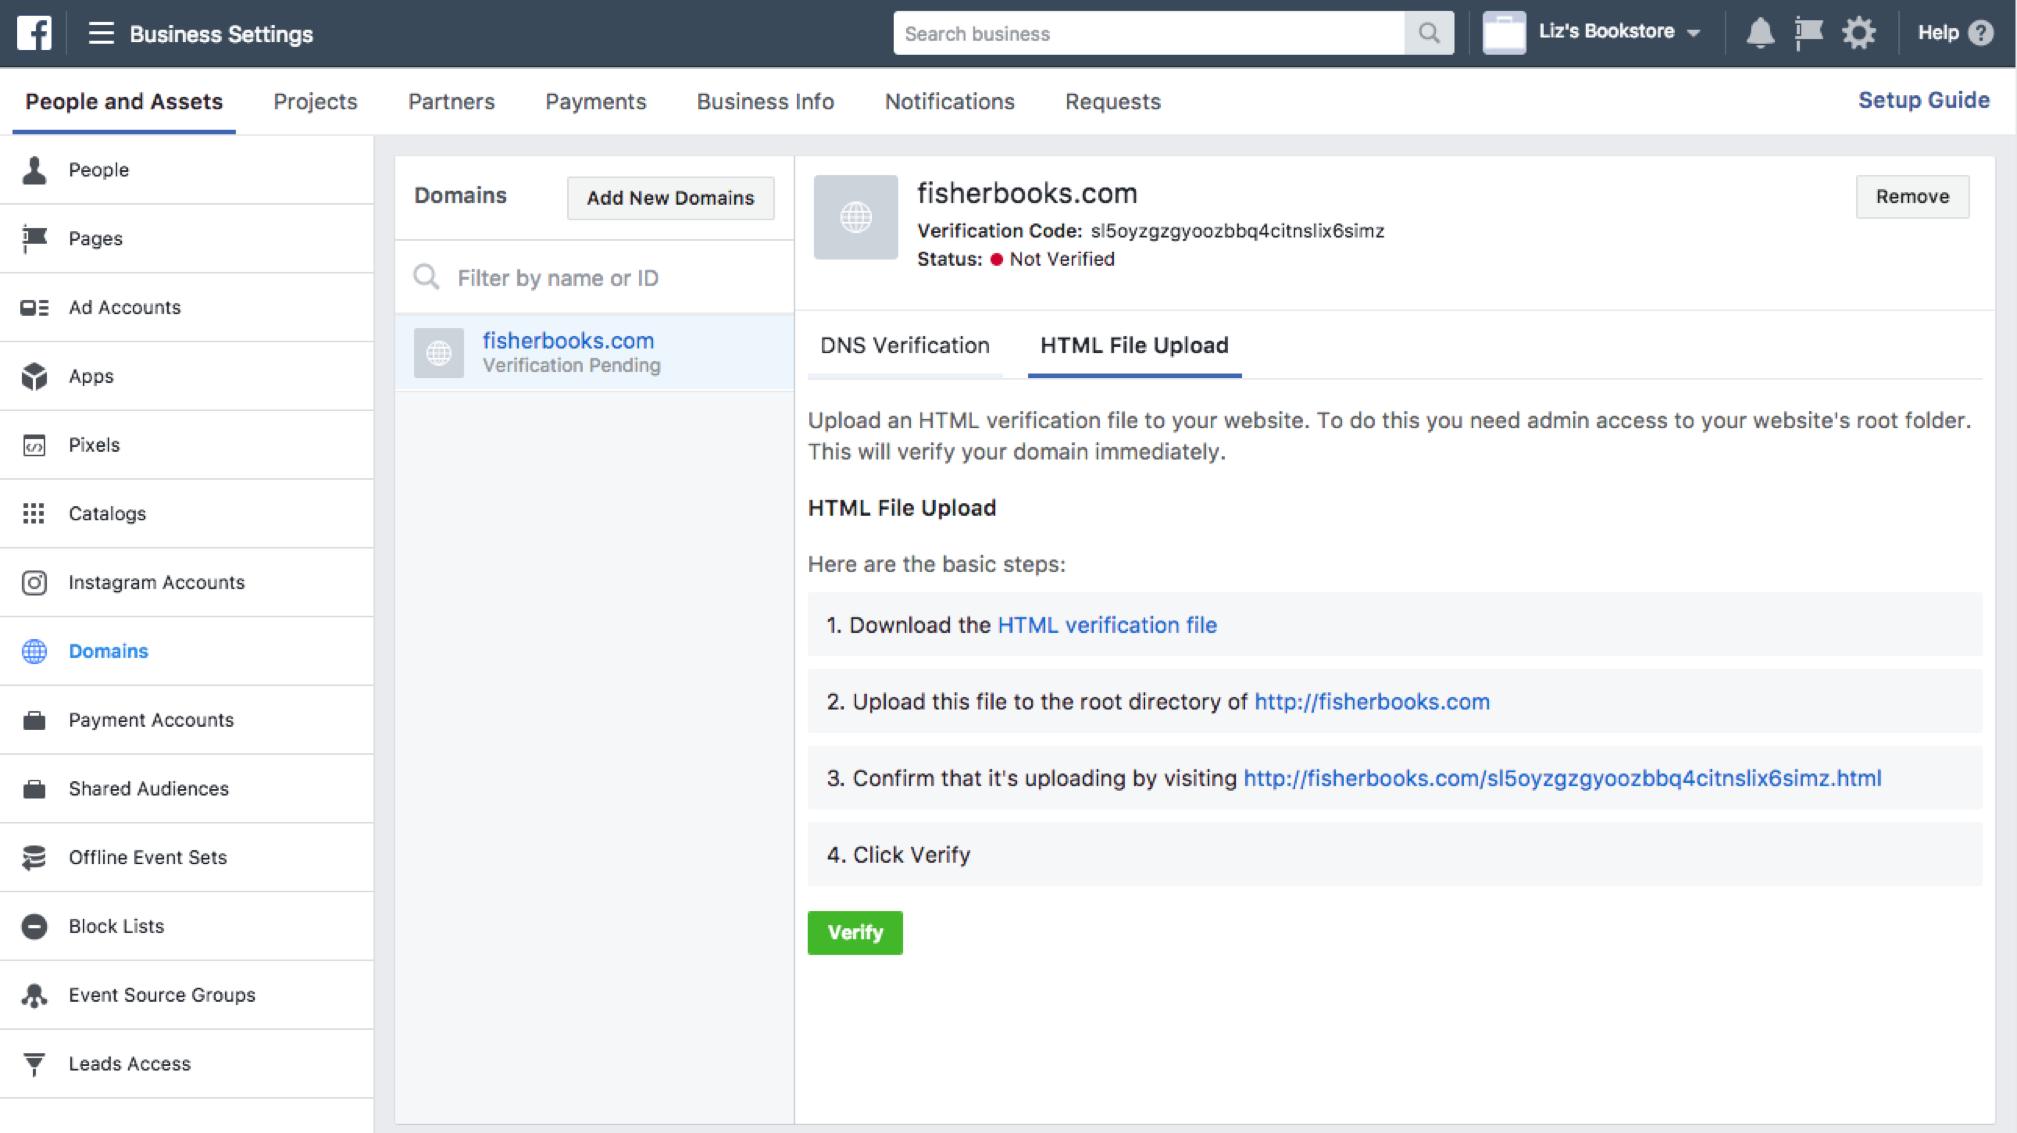
The HTML File Upload tab of your selected domain provides the HTML verification file you need to upload to your website.
- Download the HTML verification file.
- Upload the file to the root directory of your website. You will be able to see that it is uploading at the link provided in the HTML File Upload tab.
- Once it is done, click the Verify button at the bottom of the HTML File Verification tab for the selected domain.
- Leave the HTML verification file in your website’s root directory as it may be checked periodically for verification purposes.
Here’s where the simplicity of the Business Manager Verification approach shines. Assuming you went with the DNS or HTML approach instead of the OG approach, your domains are now an asset in Business manager that you can easily assign Pages to. Below are the steps Facebook shares for associating Pages:
- Under Domains, select the desired domain, and click on the Assign Pages button.
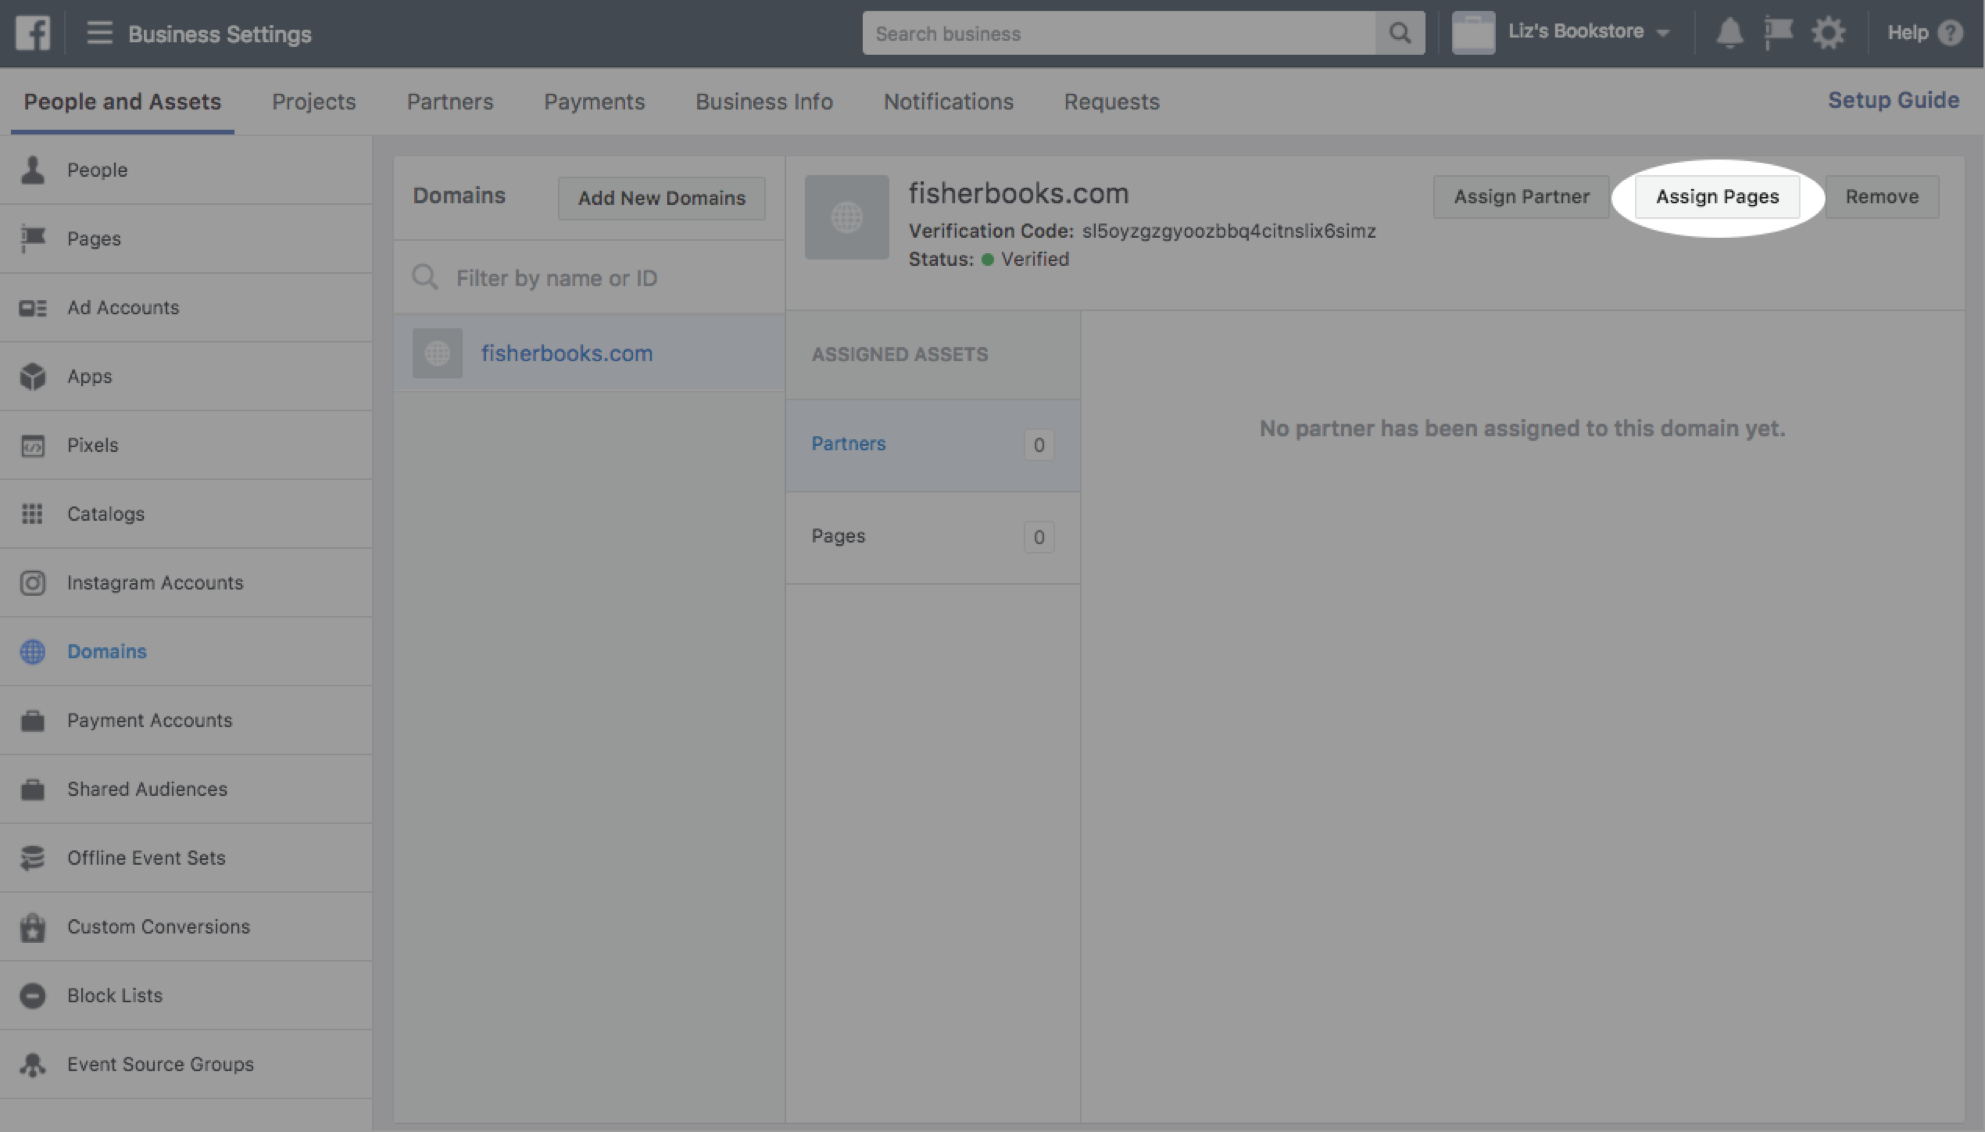
- You should see any and all of the Pages you have added to Business Manager (if your Page is not available, make sure you have imported it into Business Manager under the Pages tab). Select all the Pages you wish to add to the domain, and click Save Changes.

- You should now see any added Pages listed under Assigned Assets for your selected domain.

Step 4: You’re Done!
Want to learn about other important Facebook Updates? Check out these resources:
1. Unannounced Facebook Group Monetization Changes
Hear from social expert Matt Navarra on unannounced Facebook changes for monetizing groups, what it takes to grow a vibrant digital community, and what digital communities might look like in the future.
2. Facebook Campaign Budget Optimization Made Simple: A Step-by-Step Guide & Best Practices
You’ll need to understand Campaign Budget Optimization well if you plan to run Facebook ads beyond September 2019. That’s when CBO becomes the de facto way to run Facebook ads. We share everything you need to know, from setup to advanced tactics.

3. Social Media Conferences: The Definitive List
We take the guesswork out of planning your social media conference calendar. Our guide to the best upcoming social media conferences is based on personal experience attending hundreds of conferences, and is tailored for social media executives.
In addition to Naytev's free social analytics, we also provide a free trial of our advanced social media management, including automated social scheduling and promotion. Naytev ensures your team doesn't have to worry about social network changes. Start your free trial here.
Facebook Domain Verification Recap
Implementing Domain Verification is an easy way to control editing privileges of your content, ensuring you can modify how your content appears while also preventing others from misusing it. Facebook’s flexible options should help your team make these updates quickly and manage them easily going forward.
Your content packaging is key and Facebook is putting packaging control solidly back in your hands.
Facebook supports sharing your domain. Follow Facebook’s instructions below:
- First, complete “Step 1: Verify Your Domain”, then Select the verified domain you wish to add a partner to, and click the Assign Partner button.
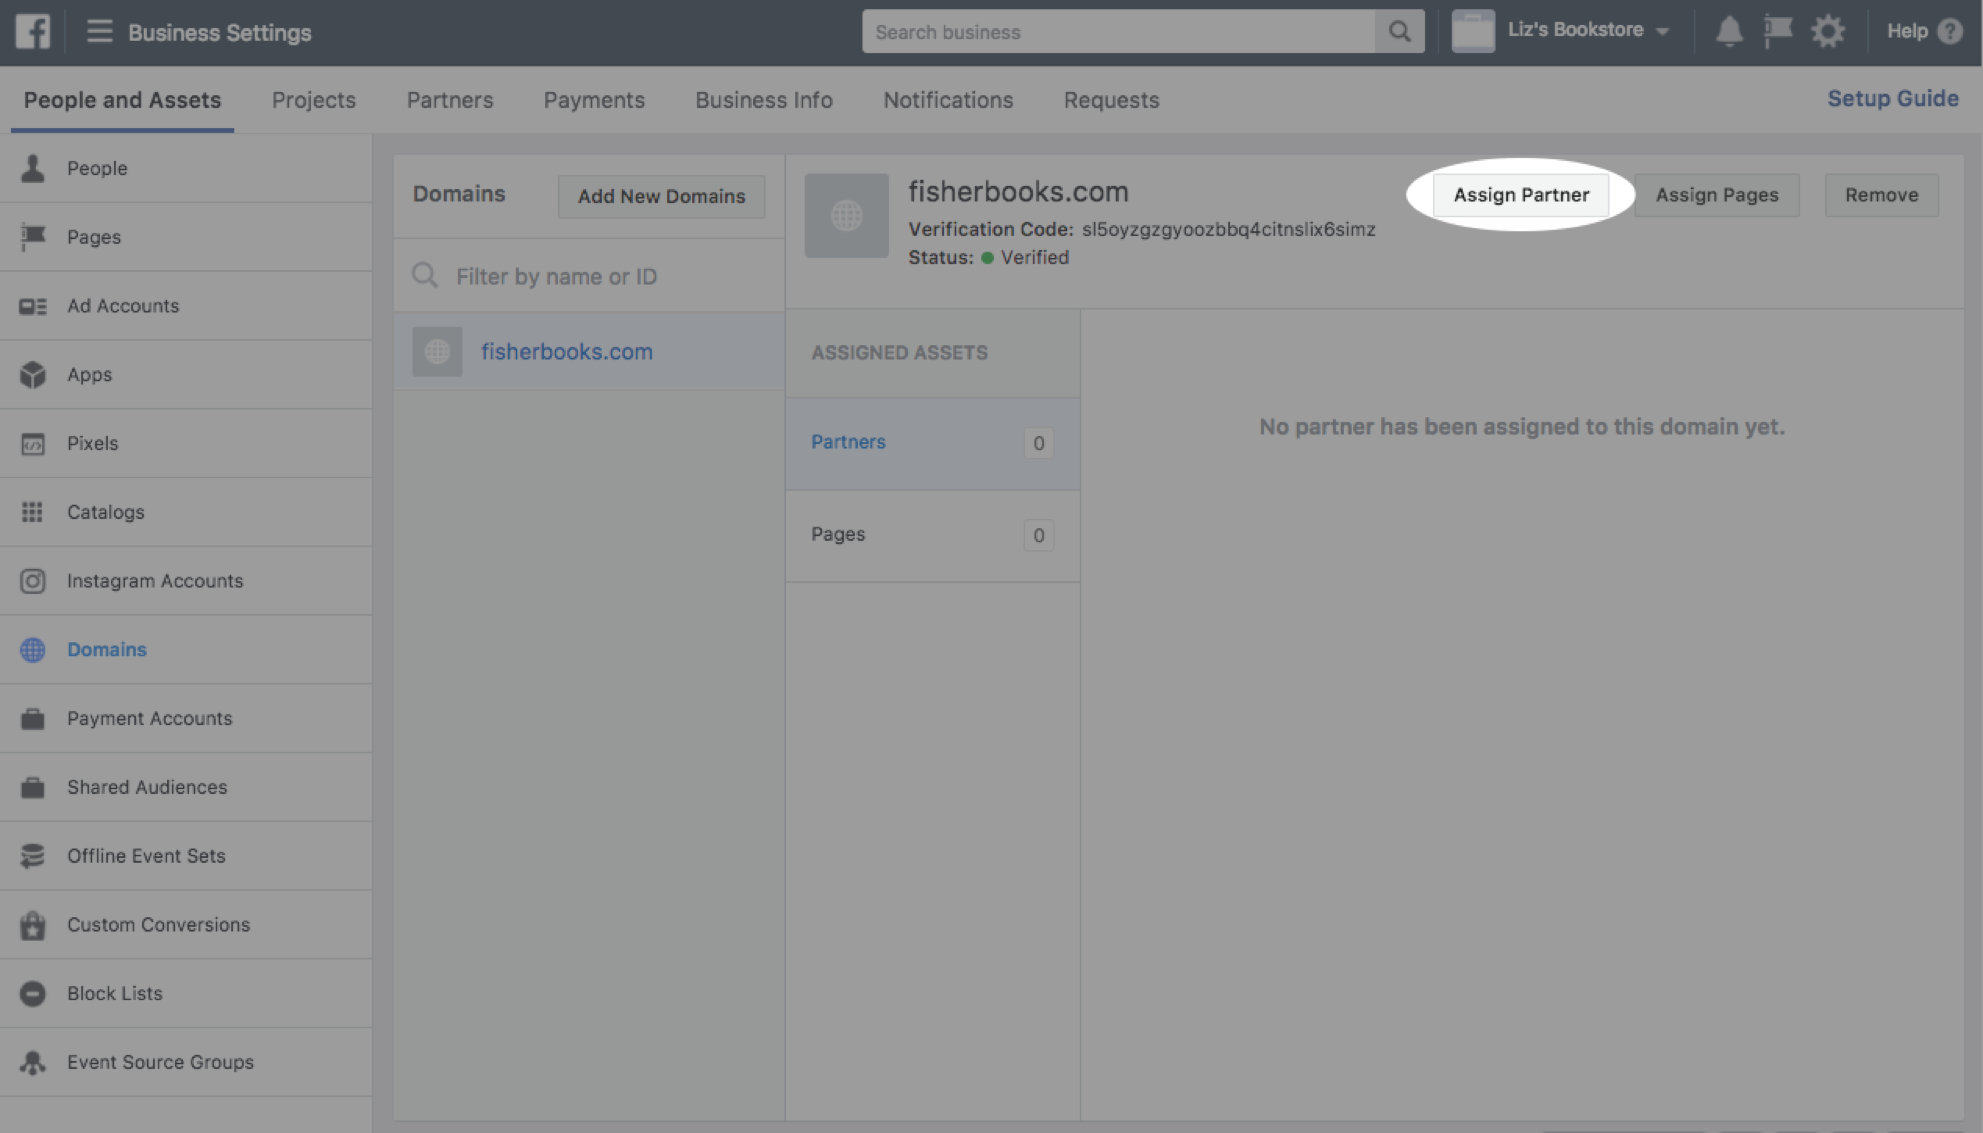
- Select Domain Admin from the Role drop-down field.

- Enable sharing by either giving your partner a link or entering your partner’s Business Manager ID.
- Share the provided link with your Business Manager partner.
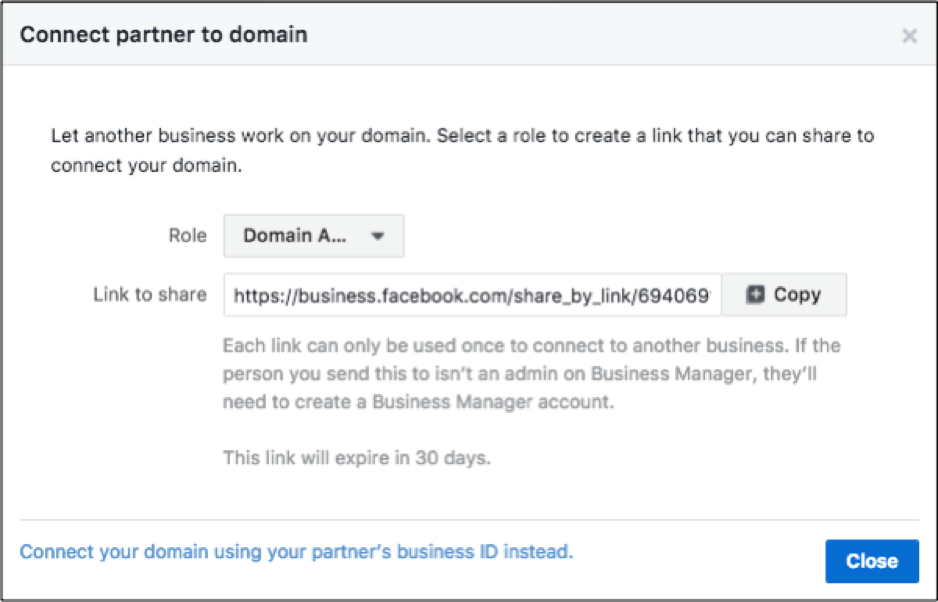
Note: Each link can only be used once and will expire after 30 days if not used. Your Business Manager partner will be able to complete the domain sharing by clicking on the link and assigning their Business Manager to the shared domain.
- Connect your domain using your partner’s Business Manager ID.
After clicking the Assign Partner button, click on the Connect your domain using your partner’s business ID instead link at the bottom of the pop-up dialog. Enter your partner’s ID, and click Connect to enable sharing.
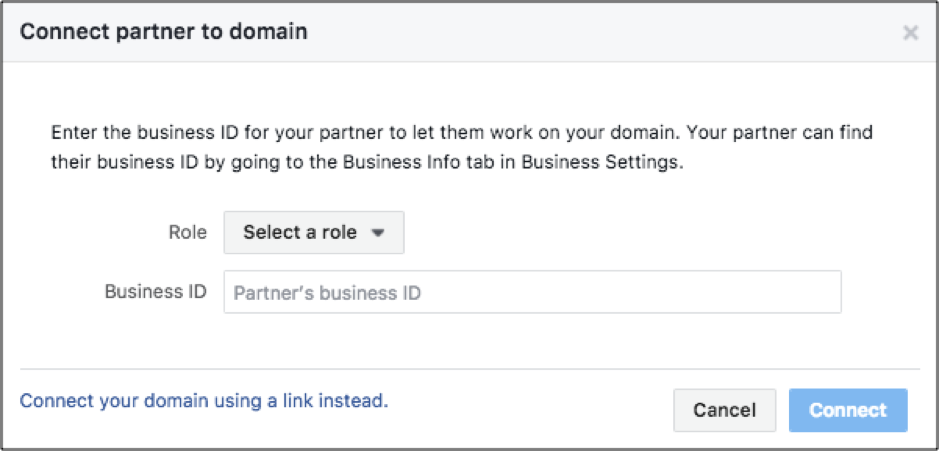
Full disclosure, we provide these steps verbatim from Facebook’s documentation to avoid any confusion. Facebook’s documentation may change over time, so here’s the original post from Facebook providing details: https://developers.facebook.com/docs/sharing/domain-verification